Installing the smart controller
This page walks through the installation of the VanTurtle Smart Controller with MaxxAir Deluxe and Plus fans.
Prerequisites
The controller interfaces with the fan in two ways: through the fan’s power wires (to monitor operating state and speed) and through a data cable (to send control commands). This data cable is not included and must be supplied separately.
Depending on the fan model, the data connection is made using either an Ethernet (RJ45) cable or a phone-style (RJ11/RJ25) cable. When using Ethernet, it is important to choose a cable with a compact or “short” plug. The RJ45 port sits very close to the edge of the fan housing, and a long Ethernet plug can place mechanical stress on the port when the fan is lowered into the roof opening.
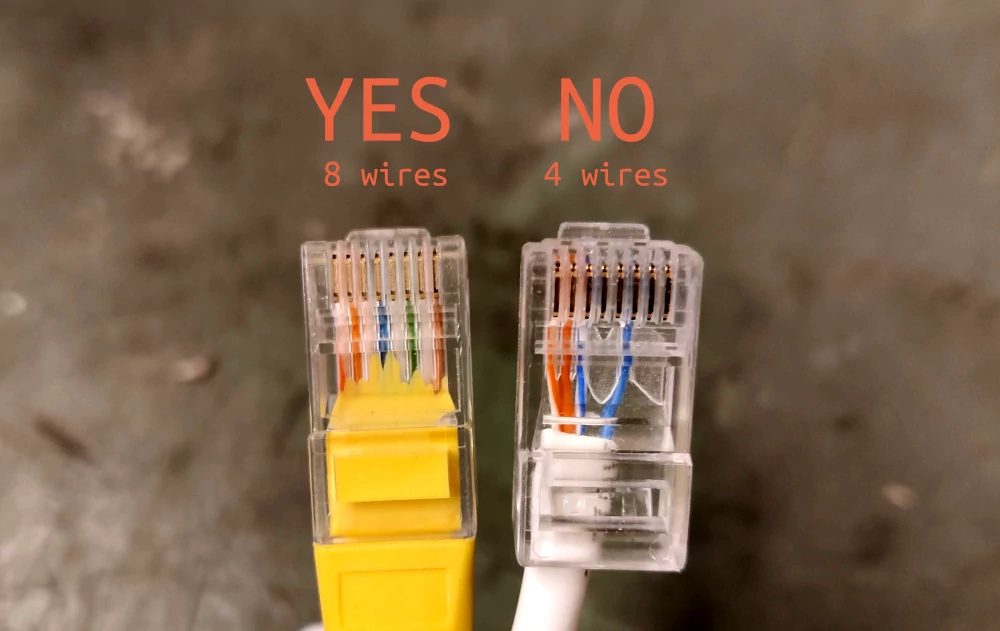
In addition, ensure the Ethernet cable contains all eight conductors. Some cables only populate four conductors and will not work correctly. Cables rated for PoE are generally a safe choice.
A fused 12V supply from your electrical system is also required. Use wiring rated for at least 5A at the intended cable length, and route it from your fuse panel to the controller location.
Install the fan according to instructions that came with it (or a good YouTube video), and make sure the data cable is connected to the fan before lowering it into the roof opening.
Connecting the controller
Once the fan is installed, the controller can be wired in. Start by connecting the Ethernet or phone cable between the fan and the controller.
Before connecting any power wires, remove the fuse feeding the fan circuit to ensure the wiring is not live. Verify with a multimeter if available. Then connect the wires as follows:
- Connect the fan’s positive wire (black) to the FAN+ terminal on the controller (leftmost)
- Connect the fan’s negative wire (white) to the left GND terminal
- Connect the electrical system’s negative (typically black) to the right GND terminal
- Connect the fused positive supply from the battery (typically red) to the BATT terminal (rightmost)

After all connections are secure, reinstall the fuse. The fan should emit a short beep and the status LED on the controller should illuminate, indicating that both the controller and fan are powered on.
Final touches
Locate the FAN PWR button on the controller board. When using an Ethernet (RJ45) connection, pressing this button should toggle the fan on and off. When using a phone-style (RJ11/RJ25) connection, pressing it should close the vent if it is currently open. Verify that pressing the button results in the expected behavior. If it does not, the data connection to the fan is not working correctly.
Next, make sure there is nothing preventing the fan from opening and press the CALIBRATE button and hold the button pressed for 3 seconds. This should make the fan beep multiple times and start the calibration sequence.
During calibration, the fan will cycle through all available speed settings. This allows the controller to measure the current draw for each speed. The controller uses this information to detect changes made through the fan’s original button panel or IR remote. This ensures that Bluetooth control stays synchronized with the fan’s actual state, even when the fan is controlled manually.
Do not press any buttons on the fan or use the IR remote while the calibration is running. It will take about a minute, during which the fan will open.
Once calibration is complete, you can proceed to pairing your phone with the controller.
